
Introduction
Using only VPN as your main method to access you homelab environment is not alway as reliable as you would hope so. VPN sometimes is unstable and hard to troubleshoot, especially remotely. If you have wonder if there is a way to access your web console of your homelab hypervisor externally and restrict access to it, this blog is what you are seeking. In this blog, I will show a use case where you can use an open-source reverse proxy alongside Cloudflare “awesome” dashboard functionality.
What you will need?
For this post, you will need three things:
1- Router that has public IP. In this blog I choose pfSense ❤
2- Virtual machine that has docker installed and has access to the internet.
3- Registered domain name through Cloudflare.
Terminology
Before diving into the project, let’s take a define some terms to establish ground-level knowledge: 
Cloudflare Dashboard: Cloudflare dashboard is where you define the DNS records and modify them. Since we’re on the subject, the dashboard so many many AMAZING services that I can’t even begin to fathom what you could accomplish with them. For the time being, we will stick with the basics ones such as:
1- DNS: To define our DNS records
2- SSL/TLS: To modify TLS negotiations with the proxy and other parties.
3- Access: Protect internal resources by requiring authentication
To read more about these services, visit their documentation page.
Traefik: Traefik is a dockerized and open-source reverse proxy and load balancer typically used with microservices in the cloud(Docker swarm, Kubernetes). 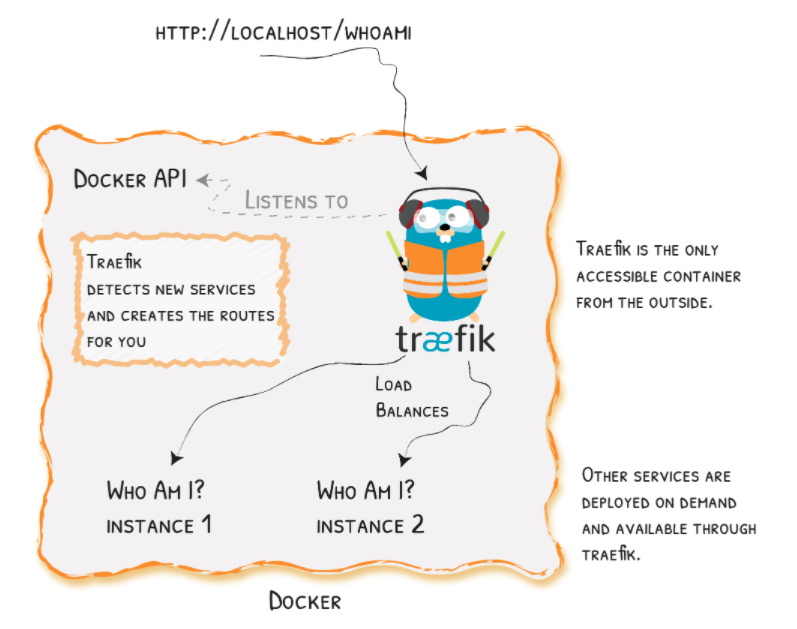
Install/Setup
- Cloudflare Setup
Under Cloudflare dashboard Go to the DNS tab and create a new ‘A’ record that corrospond to you public IP. An example is shown in the screenshot below. This record will be used for the traefik web interface. 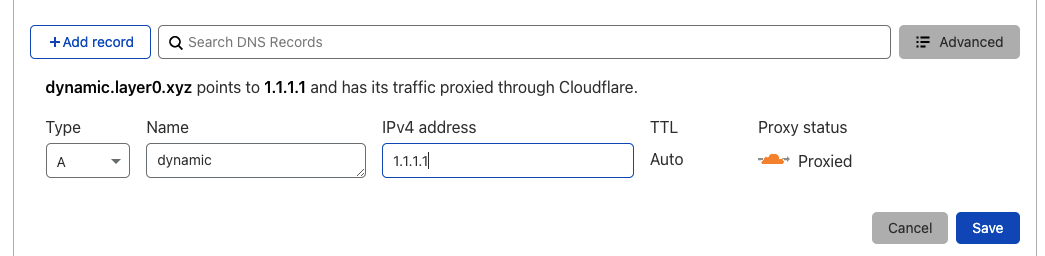
After adding the ‘A’ record, you will need to add a ‘CNAME’ record for each microservice you need to access externally. The CNAME record will point back to the Traefik ‘A’ record “dynamic” we added earlier. Here’s an example of adding a web01 record. 
Securing your mircoservices with Cloudflear Access
Cloudflare provides you with functionality where you can limit the access of specific page to certain users. The identity provider varies based on your choosing. Every identity provider has their instruction written after you choose it. After you setup your login method create an Access policy for your microservice you want to limit its access. In the screenshot below, I’m creating an access policy that limits the access of web01 page to the user with [email protected] email. There are many ways to restrict access to a page that is better than what I’m showing that Cloudflare feature such as (“Emails ends with”, “IP range”, “Access Service Token”, … ). 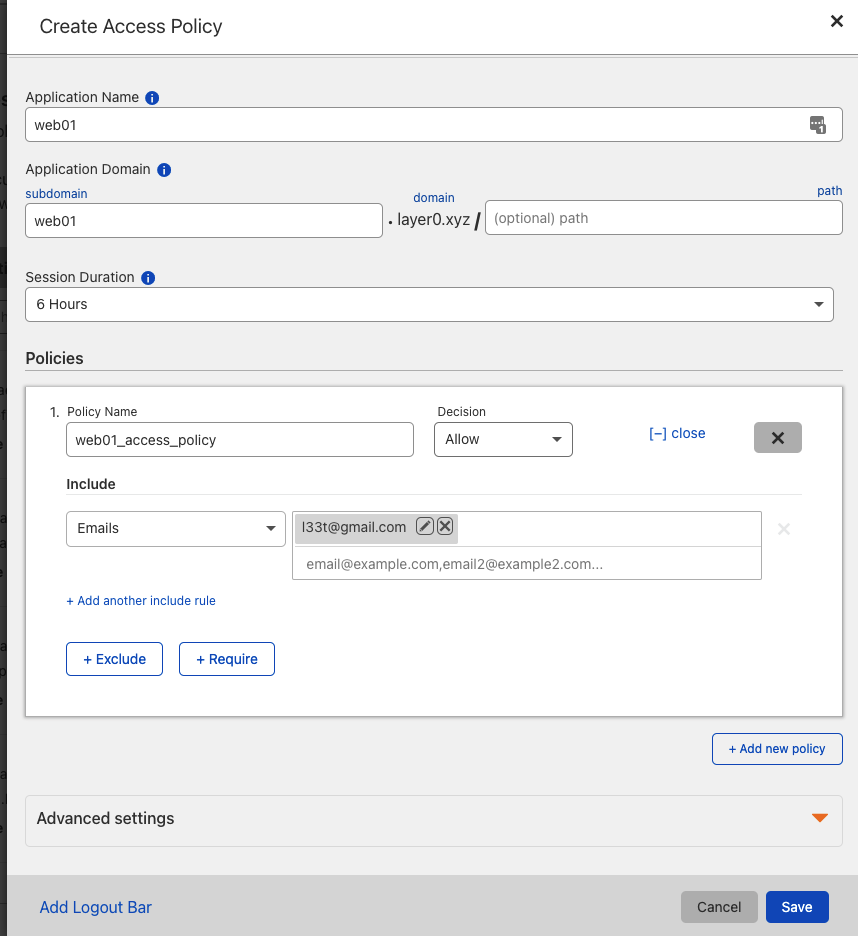
- VM setup
After we install the dependencies namely docker and docker-compose in the VM. Open the terminal in you VM and clone this repo:
root$ git clone https://github.com/sh1dow3r/Traefik_CF
root$ cd Trafik_CF
Inside the repo you will need to apply two task
1- Generate a certificate for Traefik microservices and place it in certs directory, which can be easily done with this command
mkdir -p certs; openssl req -x509 -newkey rsa:4096 -nodes -out certs/cert.crt -keyout certs/cert.key -days 365
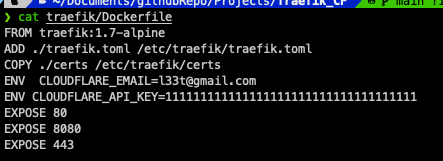
2- Make note of your Global API KEY and email from your cloudflare account. This information can be found in your under your profile Cloudflare dashboard
After you have taking the global API Key, add it to the dockerfile in Traefik folder, and add your email as well as shown in the screenshot below: 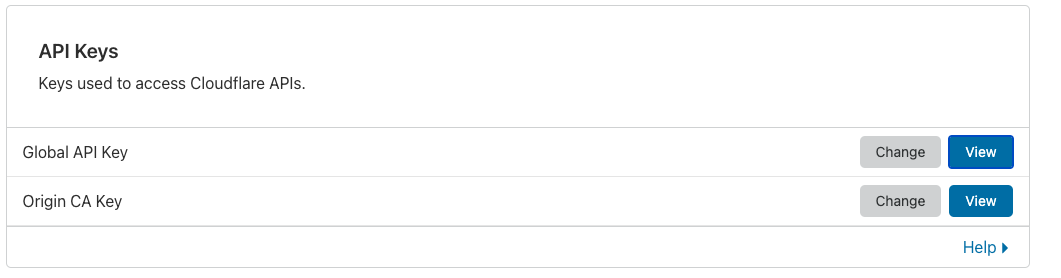
- pfSense Setup
Now that we configure pfSense to redirect the traffic coming on port 80 and port 443 of the public IP to be redirected to the Traefik reverse proxy. That will be quickly done through the NAT rule to allow port forwarding and through the Firewall Rules to allow incoming traffic to come in.
The Firewall rules would look like something like this:  The NAT rules would look like something like this:
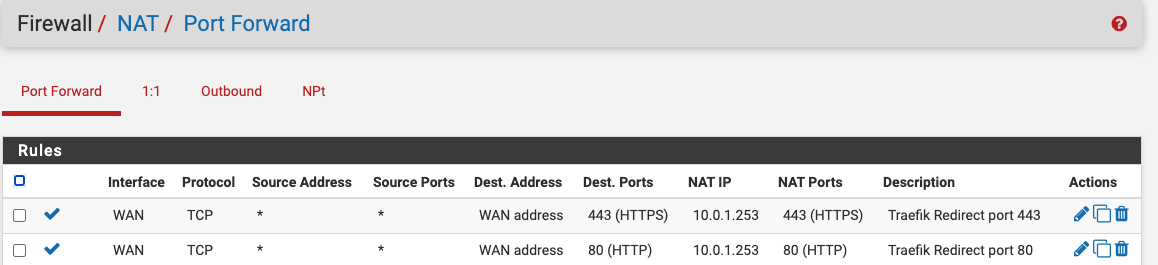
Conclusion
In this blog I explained how to add a secondary access to your homelab using Cloudflare free features and using Traefik reverse proxy. I also touched a bit how to configure the routes on pfSense to allow the traffic through using NAT rules. Using such method can help if you lose you VPN access to your environment and help prevent single point of failure on certain cases.